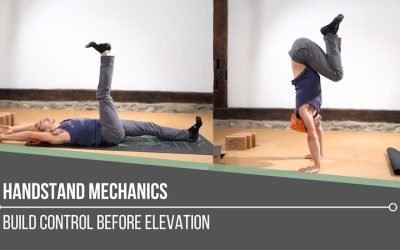
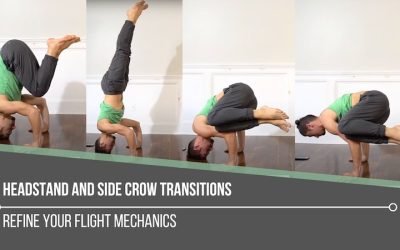
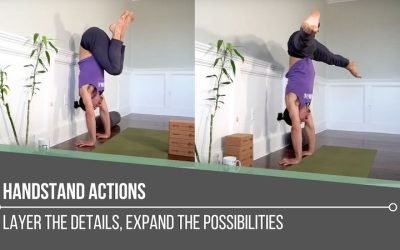
Headstand: 3 Ways In

Three Ways In

Headstand is a powerful pose, typically referred to as the King of the Yoga Asanas (poses). While the gurus and masters have long been preaching the importance of headstand, modern-day anatomists often caution against it. Physically speaking my personal relationship with headstand has been mostly positive, while emotionally there were a couple of years of fear around the potential risks. The warnings of many of my teachers, in addition to neck and shoulder pain eventually turned me away from practicing the pose. In recent years I finally discovered the root cause of my neck pain had very little to do with my neck itself and everything to do with an imbalance in one of my rotator cuff muscles causing referral pain. The reason I feel this is important to mention is that when we are in pain we can be so quick to blame that we might miss what is really going on. We see it all the time in modern medicine. Instead of searching for the root cause of our problem, we focus on the symptom. Let me be clear here, I am not saying if you have neck pain you should do Headstand, I am simply stressing the importance of searching for the root of the pain. Dig deep, keep an open mind, and explore.

So when is it appropriate to do headstand? This question is not easily answered as it depends on many factors but here are some basic guidelines to consider.
1. The state of health in your body: Headstand is most appropriate for Yogis with a healthy spine and disks, consult a chiropractor (preferably one that practices yoga) to see if it’s right for you. Same goes for blood pressure irregularities, and of course pregnancy – check with a doctor. If you have other concerns seek professional guidance. If you feel good and know you are in good health, this pose might be your next best friend.
2. Your Level of Practice, strength, and body awareness: In the video, I mention that there are three levels of entering into headstand; beginner-advanced. Personally, as a teacher I feel headstand is for the intermediate level student, so while I talk about the three levels consider that these are meant for the intermediate student. For the advanced Yoga Asana practitioner, there are multiple ways in and out of headstand, and for the beginner I feel it is most important to build the following prior to attempting the pose:

Beginners: Preparatory Strength and Technique

  1. Shoulder Strength: From the moment you begin your yoga practice you are likely building shoulder strength. If your desire is to move toward headstand, I suggest building strength specific to having your arms overhead and in front of you. Downward Dog, Arm Balances, Handstand preparations, Dolphin Pose are all great poses to start off with.
  2. Back Body, Spine Strength: Developing the muscles along the back body and spine will help to stabilize your head, torso, and legs when you are ready to work toward headstand.
  3. Neck Strength: Neck strength can be built in preparation. I recommend doing standing yoga postures with hands behind the head and pressing the head back into the hands. This will also help set the head back which can lead to a more optimal alignment of the spine when in headstand, as well as in daily life.

For my top inversion strength training exercises, check out my Handstand Video at www.TheYogiMatt.com/Handstand

Benefits of The 3 Approaches

While scrolling through Instagram and Facebook over the past year or so there is obviously a strong desire to invert amongst yogis. It is beautiful to see the determination amongst practitioners to conquer their fears and prove to themselves that they can do more than they ever could imagine. That dedication toward results typically comes with hazardous experimentation, and maybe a little bit of (dare I say) impatience? I am not innocent when it comes to this topic, which is why I wanted to offer what I have learned along the way to help speed up your overall journey, and potentially save you from some of what I have gone through. I know everyone has to go through their own journey, and I know some of you out there are indeed looking for guidance, and are excited to learn. So if you are interested in the techniques and tools that will develop and empower your practice, I have created a video highlighting three challenging yet highly effective approaches toward headstand. Each one builds strength for the next, so my suggestion is beginners really master the first one without lifting the feet off the ground, and advanced practitioners use all three as drills to build body awareness and strength.

The 3 Approaches


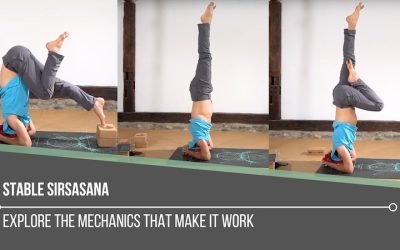
  1. Half Tuck: The Half tuck teaches the shifting of weight from the feet to the head and arms while not demanding as much body awareness and hamstring flexibility. The first step is simply learning how to point the foot that is on the ground in order to shift your weight. In the video I use a block as a method to get around tight hamstrings. You may stack more than one block so long as you feel stable. The second part of this is to tuck your second leg into your body and balance in a “tuck” position. This may be highly challenging, but keeping your legs in a tuck has the benefit of being low to the ground. Lower center of gravity is easier to balance and therefore can be a safer place to learn balance. I would say that while there is always a risk when balancing upside down, the risk is less than in a full headstand.
  2. Full Tuck: Once you find repeated success with the tuck position and feel comfortable holding it for more than a minute you might try coming straight into a tuck position rather than one leg at a time. This is more challenging on many levels but mostly it requires greater flexibility in the hamstrings, and a stronger sense of proprioception (knowing where your body is in space). If this entrance is feeling great, the second aspect of it is to start extending at the hip joint, bringing your knees upward. How high up to bring the knees will depend on your level of comfort and balance.
  3. Straight Leg Press: Going Straight into a headstand through what is called a pike position in gymnastic and acrobatic language, is definitely the most challenging. It requires tremendous body awareness, low back, and buttock strength. It requires that the hamstrings are both flexible and strong. I highly recommend getting comfortable tucking all the way up and being able to hold a straight headstand for over a minute prior to attempting this.

Note: For all three approaches be sure to have a teacher around to support you and be your eyes for what you cannot see.

Beyond the Entry

Getting into headstand is just the start of the journey. Holding the balance while breathing steady and keeping your mind focused is the real exciting and beneficial part. I love to focus on my spinal curves while upside down, finding the most enjoyable balance. I also love to play with taking pressure off my neck which I will go over in my next blog and video!

To get started with your strength training and development of body awareness visit TheYogiMatt.com/Handstand. If you know someone that would benefit from this information please share the blog on social media or email. For questions please feel free to reach out to me directly: Matt@TheYogiMatt.com

Start Practicing

#1 Tip To Advance Your Practice

Dharana: The Mastery Approach

#1 Tip to Advance Your Yoga Practice

Dharana Leads to Mastery 

There are multiple reasons why we practice asana (the physical practice of yoga), but most of us would agree that the primary one is that we feel better afterward. Asana offers us an opportunity to get to know our body on a deeper level because it demands the full attention of our mind. You can’t mentally check out while holding a balance posture; you must stay present. It’s that type of absolute focus that allows us to advance in anything we do. In the yoga sutras, the harnessing of our mind’s attention to focus on one thing is referred to as Dharana. We can get to the state of Dharana on and off the mat. It’s a skill that can permeate every aspect of our life. To become masterful at anything we do, we must practice this single-pointed focus. So how do we do it in our asana practice?

The challenge most of us face is that our only measure of progress in the asana practice is the attainment of postures. I say asana specifically because the yoga practice includes far more than the study of the physical body, and for this discussion, I want to target the development of our physical awareness. If the postures are our only measurement, then we subconsciously will strive for the ability to achieve more of them so long as we feel safe enough. On the other hand, if we don’t feel safe then we will likely hold ourselves back from our potential. I’d like to invite you to focus your attention on something more specific in your physical practice: targeted, intentional muscle activation and the sensations you experience while doing so. Instead of practicing many postures, focus on fewer postures with several muscle activations. The body has a tremendous amount of muscles, so limit your options by focusing on one area of your body i.e. the hips, shoulders, spine, ankles, core, etc. This is how I structure my Elements of Mastery immersion, I take you through simple postures while targeting each area of the body throughout the weekend or online course. In the video below, I give the example of how to activate 3 different muscle groups in the “hips” category for one single posture, lunge pose.

What Does it mean to be advanced?

The practice of yoga is always about developing some form of awareness through intentional actions. Advanced in the physical practice of asana means heightened proprioception of the body or “Body Awareness.” Understanding how to activate the various muscles of the body in order to move your bones/joints and be able to feel the sensations of these actions is what qualifies an advanced practitioner. For some, that may result in complex postures that require flexibility and strength, and for others, it might be living a more pain-free life. In any case, “advanced” is not aesthetic, it’s functional, which may or may not be visually pleasing to someone watching. The recent interest in fascia, the connective tissue of the body, has revealed many findings in modern research. While researchers are just a few years into the study of connective tissue, studies are showing the correlation between proprioception and chronic pain – those that are less aware of and capable of moving or activating certain areas of their body also experience chronic pain in these areas. What that means for us practicing yoga is to use the practice to develop greater body awareness if we want to decrease chronic pain. Watch the video below to see how I explore different muscle groups within a simple lunge posture

4 KEY MOVEMENTS

To simplify your adventure, let’s look at one way of breaking down potential engagement into 4 directional movements.

  1. Squeeze in: This can be any movement where the extremities are moving or are trying to move toward each other, or more specifically toward the midline of the body. It can also mean the front body contracting inward toward the center of our core – a full tuck position or balasana-child’s pose. In anatomy terms, I am referring to Adduction and Flexion of the body.
  2. Push Out: This is the opposite engagement or movement- away from the midline or when the front body expands like you are stretching out after a good night’s sleep. Anatomically speaking, this is Abduction and Extension of the body.
  3. Turn in: When the Extremities Rotate toward the midline of the body
  4. Turn out: When the Extremities rotate outward and away from the midline.

In addition, you have side bending and twisting. Side Bending is a push out on one side and a squeeze in on the opposite, while twisting the spine is a rotation along the central axis. My suggestion is to start with the four key movements as they will provide a strong platform to work with.

ELEMENTS

Another approach toward simplification of the complexity of the body is using the elements of nature (Earth, Water, Fire, Air). This is the basis that I use for the Elements of Mastery both the online version and live immersions. With the elements, you can still refer back to the 4 Key Movements.

Earth: The way I structure the earth practice in EOM is we look at the foundations of our postures – the two main connectors to the earth are the feet and the hands. There are 4 main directions of the ankles and if you practice these joint articulations throughout your standing postures, you will gain mastery over the feet and ankles; the same is true for the hands.

Water: The Element of Motion and Emotion appropriately relates to the hips which are the main area of our body that initiates movement from one place to another. The video above is a great example of hip activation in one posture. To really dive deep into developing awareness of the hips check out Hips: Rock Em and Unlock Em

Fire: Relates to the Core. The four directions of core activation are Flexion, Extension, Rotation, and Lateral flexion. Of these, Flexion and Rotation are most accurate to the element of Fire. To get to know these best you will want to practice Parts 3 and 4 of Elements of Mastery.

Air: Air relates to lateral flexion and extension of the spine along with thoracic diaphragmatic breathing. Practice Parts 4 and 5 of Elements of Mastery.

4 KEY MOVEMENTS

By exploring the multiple options within just a few postures, you will gain tremendous insight into your body.  When you focus your attention in this way, more advanced postures will likely become accessible simply because of your increased ability to activate muscles and move your joints. This masterful approach done over the course of time will increase the health of your muscle tissue leading to an increased range of motion and greater strength.

Dharana is the practice of focusing your attention or harnessing the full power of your mind. Now you know how to apply it to your body, but you can also apply this skill to anything you do.

Elements of Mastery

The most in-depth online yoga immersion offered by Matt Giordano. This immersion contains several full-length workshops focusing on how the body relates to nature’s elements: Earth, Water, Fire, Air, & Space. In addition to deepening your physical practice, you will learn anatomy, adjustments, and the approach to Mastery!

Product Bundles

Get access to 3 or more products so you can develop your yoga practice in a well-rounded and enjoyable way right from your home! You will not only save money but you will also have unlimited access to feeling better in your body and mind!

Continue Learning

Lotus Foundations

Lotus Foundations

Lotus FoundationspadmasanaLOTUS FOUNDATIONS Lotus Pose requires a healthy amount of hip flexibility. For some, it comes easy. There are a couple of factors to consider when it comes to how “easy” it appears. These might be that the person is hypermobile in the hips,...

read more
Hips and Eka Pada Galavasana

Hips and Eka Pada Galavasana

Hips and Eka Pada Galavasanaflying pigeonHIPS AND EKA PADA GALAVASANA Depending on where we are in our asana practice journey, arm balances may feel a little overwhelming. It can be difficult to know where to start. Instead of thinking about the final destination, we...

read more
Hip Flexor Health For Better Movement

Hip Flexor Health For Better Movement

Hip Flexor Health for Better MovementstretchHIP FLEXOR HEALTH FOR BETTER MOVEMENT Healthy hip flexor muscles are associated with both stretch and strength. Although we’re going to focus more heavily on strength in this article, always note that both strength and...

read more
6 Postures For Hips and Lower Back

6 Postures For Hips and Lower Back

6 Postures for Hips and Lower Backstretch6 POSTURES FOR HIPS AND LOWER BACK When we're interested in learning about postures that help us with our hips and lower back, it’s simply not good enough to find a video or practice that says that certain poses will help with...

read more
Hips & Hanumanasana

Hips & Hanumanasana

Hips & HanumanasanasplitsHIPS & HANUMANASANA What a posture! Hanumanasana is such a beautiful expression of what is possible in our physical yoga practice. However, it’s not about “achieving” Hanumanasana but about the exploration of what is possible in terms...

read more
Tripod Headstand To Crow Pose

Tripod Headstand To Crow Pose

Tripod Headstand to Crow for Controlled AccessinversionsTRIPOD HEADSTAND TO CROW POSE When exploring an inversion like Tripod Headstand, the shoulder muscles become part of the primary focus. Tripod Headstand on its own can be challenging enough, but adding a...

read more

TOP RECOMMENDATIONS 

Handstand Training

Learn the techniques that make Handstand fun, easy and accessible! This 2 part course consists of the top most effective exercises will increase your strength and technique so you can easefully balance a handstand.

View Details

SHOULDER REVELATION

In this 12 class immersion  you will practice specific techniques to strengthen and unlock your shoulders. Each class focuses on a specific joint articulation and muscle group so you gain mastery in the shoulders.

View Details

HEART OPENERS

Finally, a 12 class immersion designed specifically to help you discover the freedom of heart openers. Learn how to avoid uncomfortable compression, and awaken your true range of motion in a step by step manner.

View Details

THE FREE TECHNIQUE PACK

When You Subscribe, You Will Get Instant Access to

  • the Technique Pack: 15 yoga pose breakdowns
  • exclusive online course discounts
  • exclusive blogs and videos
  • This field is for validation purposes and should be left unchanged.

Still Have Questions? Email Matt Directly

  • This field is for validation purposes and should be left unchanged.

Pin It on Pinterest