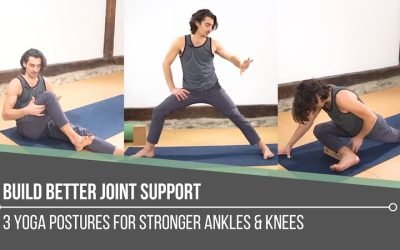
Build Better Joint Supportankle & kneeBUILD BETTER JOINT SUPPORT Sometimes we focus so heavily on flexibility that we forget our joints also need intelligent strength surrounding them. Matt reminds us that stability is not rigidity. It is the body’s ability to...
A Yoga Treatment For The Shoulders
A Yoga Treatment For The Shoulders
STABILITY
A YOGA TREATMENT FOR THE SHOULDERS
Shoulders tend to speak up when stability is missing. Matt reminds us that building strength isn’t about aesthetics, it’s about support, resilience, and keeping the body working as one integrated system. This practice becomes a yoga treatment for the shoulders by addressing vulnerability with intelligent loading and clear mechanics. What looks simple on the surface asks us to organize the back body, refine scapular placement, and strengthen the muscles that hold us upright. Reverse plank becomes our entry point, activating the rear deltoids, triceps, and upper back while teaching the shoulder heads to roll back into safer alignment. Instead of chasing stretch, we build structure. When structure improves, health follows, because strong shoulders don’t just move better, they stabilize everything above and below them.

YOGA FOR STRENGTH
YOGA ASANA, CALISTHENICS, BODY WEIGHT TRAINING
- 8 Chromatic Yoga practices with founder Matt Giordano
- Physically Invigorating Yet Accessible
- Calisthenics and Body Weight Training For Improved Strength and Functionality
- Improve Joint Integrity, Mobility, Balance, Stability, and Muscular Health
- All Major Movement Joints
- Designed as “Your Daily Yoga” 60 Minute Classes
- Non-dogmatic, Anatomy informed Alignment
- The Perfect Blend of Knowledge and Practice
- Chromatic Slow Flow Style: Moderate Vinyasa Pacing Infused with Technique and Non-dogmatic Alignment
- 8 Continuing Education hours with Yoga Alliance and American Yoga Council
- 8 Accredited Practice Hours with the Chromatic School of Yoga
- Step-by-Step instruction for increased accessibility
- Sweat, Breath, Strengthen, Stretch and Feel Amazing!
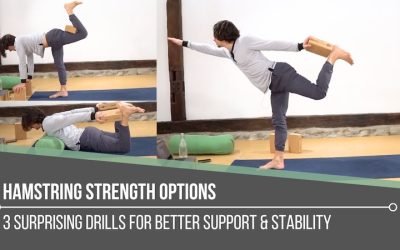
TARGET THE REAR DELTOIDS
From Reverse Plank, Matt directs us to internally rotate the arms while rolling the shoulder heads back, immediately waking up the posterior shoulder fibers. Pressing the hands down and back engages the triceps and rear deltoids, creating shoulder extension while drawing the shoulder blades toward each other. This is the opposite muscle pattern of plank and that contrast is a vital tool. As hips lift, we actively retract the scapula and feel the back body participate. This portion of a yoga treatment for the shoulders teaches us how pushing backward through the arms creates support through the upper spine. It’s not passive holding, it’s intentional effort that conditions the muscles behind the shoulders to carry load, preparing us for deeper backbends and arm-supported shapes later.
WATCH THE VIDEO
A YOGA TREATMENT FOR THE SHOULDERS: 3 POSTURES TO ASSIST WITH STRENGTH & STABILITY
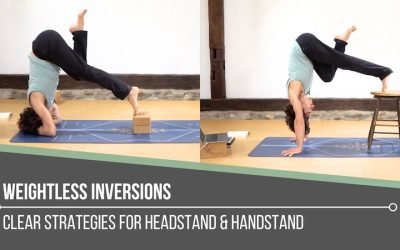
UPWARD FACING DOG MINI WORKSHOP
Before full Upward Dog, Matt slows everything down. Using blocks, we rehearse shoulder alignment first: shrug up, roll back, then press down through the hands while keeping the chest moving forward. That downward press lights up the posterior shoulders, triceps, and muscles between the shoulder blades. Only then do we add spinal extension. When we move into Upward Dog, knees start further forward so weight transfers clearly into the hands. Pulling the blocks back draws the chest through, lifting the heart without collapsing into the lower back. This phase of a yoga treatment for the shoulders teaches us that Upward Dog isn’t about hanging in flexibility, it’s about pressing, organizing, and letting the shoulders guide safe spinal lift.

200 HOUR ONLINE TEACHER TRAINING
GET CERTIFIED & DEEPEN YOUR YOGA PRACTICE
- Deepen your yoga practice
- Build confidence speaking in front of groups in person and online
- Learn foundational class structures and templates
- Learn techniques for a wide range of yoga postures
- Get certified and highly qualified to teach yoga
- Yoga Alliance Globally Recognized Certification Program
ISOMETRIC ROTATIONS
Side plank introduces opposing actions that stabilize the rotator cuff. Matt cues us to externally rotate the upper arm until the shoulder head rolls back, then internally rotate against that action without moving, creating an isometric lock. This co-contraction keeps the joint centered while we push through the hand and stack the feet. The power originates at the scapula and travels through the arm into the palm. He also reminds us to stay engaged as we exit poses, releasing effort only once weight is gone. This is a key injury prevention habit. These isometric rotations complete a yoga treatment for the shoulders, teaching us how opposing muscle groups work together to protect the joint under load.

300 HOUR ONLINE TEACHER TRAINING
GET 500 HOUR CERTIFIED AS A MASTER TEACHER
Master your skill set as a teacher through refined techniques, anatomy, biomechanics, sequencing, philosophy, meditation techniques, theming, yoga business, and much more!
- Get 500 hour certified
- Learn anatomy, biomechanics, asana techniques
- Expand your teaching skills
- Masterful sequencing and verbal delivery
- Learn meditation and breathwork techniques
- Transformative tools: theming, dharma talks, satsang
STABILITY YOU CAN CARRY FORWARD
What ties this practice together is awareness under effort. From reverse plank to Upward Dog to side plank, Matt shows us how deliberate activation builds lasting support. Rear deltoids, triceps, rotator cuff, and scapular stabilizers all learn to share responsibility instead of leaving the shoulders vulnerable. This is why framing these actions as a yoga treatment for the shoulders works. It trains coordination, not just muscles. As Matt demonstrates each drill, we see how structure creates freedom: shoulders roll back, hearts lift, and strength becomes functional. These aren’t isolated exercises, they’re transferable skills that show up in backbends, arm balances, and everyday posture. When we move with intention, the shoulders stop compensating and start cooperating.
If you missed it, you can still access Matt’s recent online yoga immersion Yoga For Strength. Get lifetime access here.
The 200 Hr. Teacher Training: Click Here to See the Next Start Date
The 300 Hr. Advanced Teacher Training: Click Here to See the Next Start Date
Article by Trish Curling
Video Extracted From: Yoga For Strength Immersion

ONLINE ANATOMY COURSE
- Accessible, exciting, and easy to learn
- Anatomy and biomechanics for yoga
- Appropriate for both teachers and students
- Learn joint alignment vs pose alignment
- Demystify yoga poses and transitions
- Release aches and pains
- Learn how to avoid common injuries
- Caters to all levels with modifications and props
- 20 hours Continued Education Credits with Yoga Alliance
- 20 hours toward Chromatic Yoga Certification and 300 Hour
- Lifetime access
Continue Learning
Build Better Joint Support
read more
Hamstring Strength Options
Hamstring Strength Optionship extensorsHAMSTRING STRENGTH OPTIONS When we think about hamstrings in yoga, most of us immediately think about stretching. Matt reminds us that this powerful muscle group is rarely celebrated for what it is also designed to do: create...
Weightless Inversions
Weightless InversionssirsasanaWEIGHTLESS INVERSIONS Weightless inversions are not about removing effort. They are about redistributing it with awareness. Matt reminds us that when we refine how we place weight through the hands, shoulders, and core, the body begins to...
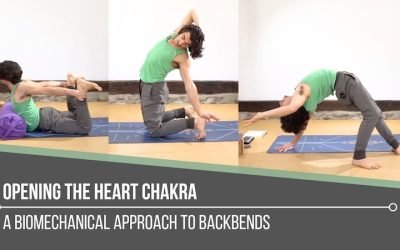
Opening The Heart Chakra
Opening The Heart ChakrabackbendOPENING THE HEART CHAKRA Opening the heart chakra is not simply about reaching deeper into a backbend. Matt reminds us that this space is rooted in love, balance, and connection, both with ourselves and with others. It reflects how we...
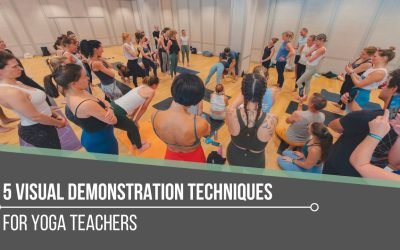
5 Visual Demonstration Techniques for Yoga Teachers
5 Visual Demonstration Techniques for Yoga TeachersYoga TeachersVisual Demonstration This is often confused with “teaching from the mat.” Teaching at the front of the room can be useful at the right time and place, but that is not what we are referring to here. In...
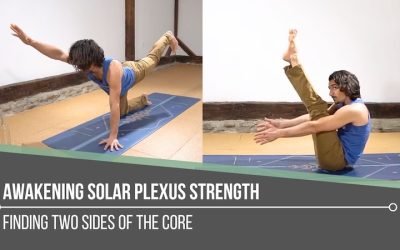
Awakening Solar Plexus Strength
Awakening Solar Plexus Strengththird chakraAWAKENING SOLAR PLEXUS STRENGTH Awakening solar plexus strength invites us into the centre of transformation. Matt reminds us that this third chakra, Manipura, is our fire, our willpower, and our ability to take action. It...
THE FREE TECHNIQUE PACK
When You Subscribe, You Will Get Instant Access to
- the Technique Pack: 15 yoga pose breakdowns
- exclusive online course discounts
- exclusive blogs and videos


