Hip Rotations Techniques for Increased Mobilityrange of motionHip rotations for increased mobility Injury, pain, and tightness are unfortunately just a few of the things that are commonly associated with the hips. Making efforts to improve hip mobility can help you...
Hip Rotations: Techniques For Increased Mobility
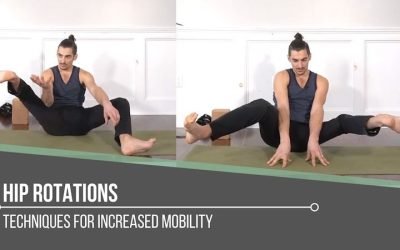
Hip Rotations
Techniques for Increased Mobility
range of motion
Hip rotations for increased mobility
Injury, pain, and tightness are unfortunately just a few of the things that are commonly associated with the hips. Making efforts to improve hip mobility can help you manage these conditions. What is mobility? Mobility is your ability to control a limb through a specific range of motion. This is why exploration is such an important aspect of a physical yoga practice. After all, exploration is how you get to know yourself: You come to more deeply understand your current physical state each time you step on the mat. More importantly though, you find the keys to unleashing your potential. Practicing hip rotations for increased hip mobility can take you on the path to increased stability, strength, and flexibility in the hips. Hip rotations for increased mobility can be explored in more unique ways than you might think.

HIP MOBILITY
October 2022 Immersion
- Strengthen and lengthen your hips
- Increase active and passive range of motion
- Learn anatomical techniques to improve functionality
- Access a wider range of seated postures and hip openers
- 12 Classes: All levels appropriate
- Lifetime unlimited access to all
- Attend the livestream OR practice the replays any time that’s convenient for you
$148.00
ANATOMY OF THE HIP
First, let’s talk about the anatomy of the hip. The hip is a ball-and-socket joint, which means that the femur bone (upper thigh bone) has a little ball on the end and inserts into the side of the ilium (pelvis). This ball, or head of the femur, rotates around in that shallow opening of the pelvis, where ligaments keep the head of the femur bone in the socket (hip joint). Ligaments provide stability in the hip joint, while the muscles that surround the hip create movement. Activating muscles, particularly through range of motion, serves to support people who are hypermobile in the hips just as much as people who feel restrictions and/or tightness. Engaging muscles through range of motion helps to mobilize the thigh bone inside of your pelvis.
WATCH THE VIDEO: HIP ROTATIONS: TECHNIQUES FOR INCREASED MOBILITY
ACTIVE VS. PASSIVE RANGE OF MOTION
Understanding the difference between active and passive range of motion is essential to being able to understand the body. It’s possible to believe that you have the capacity for quite a large range of motion, but this may be due to either hyper-mobility or flexibility, or it’s because it’s available to you passively by using the support of someone or something to move the joint to a particular degree. Active range of motion means that you have the strength to move the joint to a particular degree without any assistance other than your own muscle strength.

NEXT TRAINING BEGINS FEBRUARY 2024 ENROLLMENT NOW OPEN!

NEXT TRAINING BEGINS FEBRUARY 2024 ENROLLMENT NOW OPEN!
HIP ROTATION TECHNIQUES
In the video, you’ll see the unique techniques Matt offers for you to explore hip rotations within each option. The actions/techniques can be quite humbling. This is where patience is a must.
Here are the steps:
Option 1
- Sit and take your feet wide, with toes forward
- Bring your feet up to the sky
- Externally rotate the right leg (like Happy Baby Pose) while internally rotating the left leg in as much as possible
- Breathe as you alternate
- To maintain better control and balance, you may leave hands or fingertips on the ground in front of you or behind you
Option 2
- Feet are on the ground and wide apart
- As you externally rotate one thigh, the other internally rotates (creating a 90-degree angle with both legs)
- It may be helpful to turn your torso towards the leg that is externally rotated
- Lift the foot of the back leg (the thigh that is internally rotated) and then lower. Special note: Evert the ankle as you lift the lower leg away from the ground
- Switch to the opposite leg (the thigh that is externally rotated) and lift the foot. Special note: Invert the ankle while lifting the lower leg away from the ground
Option 3
Matt also refers to this option as “Unhappy Boat Pose”:
- Both feet are wide, with knees and toes turned out (external rotation)
- Reach your arms forward for counterbalance
- Add in hip flexion by alternating the lift of each leg (activating the adductor muscles and core)
- Lift both legs up at the same time (Unhappy Boat Pose!) while continuing to turn your legs out as much as possible, as if to turn the toes down towards the ground
- Finally, release and rest with a passive internal rotation (feet wide, hands back behind you, and knees folding in to rest towards one another)

MOBILITY
ONLINE YOGA IMMERSION
- Key techniques to increase flexibility
- Strength development for mobility and range of motion
- Learn postures: Hanumanasana (Splits), Extended Side Plank
- Active and passive mobility for shoulders, hips, and spine
- Improve spinal twists, heart openers, shoulder openers, and hip openers
- Find greater ease in seated postures
- Improve mobility and posture off the mat
- When and how to do active, passive, and isometric stretching
$148.00
HOW DOES THIS HELP?
With these techniques, you’re attempting to use the muscles of the hip to encourage active range of motion. If you take hold of your foot at any time to assist (passive range of motion), you will likely see a difference in what is available to you. By working on the active range of motion, you are essentially trying to decrease the gap between what is available to you passively versus actively. This will help to minimize injury and improve performance because you will have the strength and stability to control the way you move with less outside force.
These techniques merely scratch the surface of how you can really tap into your potential. Register for Matt’s 12-class immersion called Hip Mobility.
See you on the mat!
The 200 Hr. Teacher Training: Click Here to See the Next Start Date
The 300 Hr. Advanced Teacher Training: Click Here to See the Next Start Date
Article by Trish Curling
Video Extracted From: Mobility Immersion
CHOOSE YOUR PATH
NEXT TRAINING BEGINS FEBRUARY 2024 ENROLLMENT NOW OPEN!
NEXT TRAINING BEGINS FEBRUARY 2024 ENROLLMENT NOW OPEN!
Continue Learning
Hip Rotations: Techniques For Increased Mobility
read more
theyogimatt on deep rooted bliss podcast
DEEP ROOTED BLISS PODCAST INTERVIEW FINDING FULFILLMENT AS A YOGA TEACHER & ENTREPENEURCOURAGEDEEP ROOTED BLISS INTERVIEW OVERCOMING BURNOUT AND FINDING FULFILLMENT AS A YOGA TEACHER In 2014 Rebecca Doring, founder and host of the Deep Rooted Bliss Podcast, came...

L Pose Handstand Training
L Pose Handstand Training Activate Core and Hip Flexorshandstand prepL POSE HANDSTAND TRAINING We’re all aware of the importance of taking baby steps when we have a bigger goal we’d like to achieve. L Pose Handstand training falls under that category when it comes to...
Serratus Push Ups Tutorial
Serratus Push-Ups Tutorial Variations for StrengthstrengthWhat Is The Importance of Serratus Anterior Push-Ups? When you hear the term “boxer muscles,” you most likely know that it’s referring to the serratus anterior. However you refer to it, it's an important part...
SHORTEN TO LENGTHEN YOUR STANDING SPLITS
SHORTEN TO LENGTHEN YOUR STANDING SPLITS INCREASE FLEXIBILITY WITH THIS TECHNIQUEHANUMANASANASHORTEN TO LENGTHEN What does shorten to lengthen your standing splits even mean? Does that even make sense? At first thought it may seem counterintuitive that if you want to...
Open Your Heart in Camel Pose
OPEN YOUR HEART IN CAMEL POSE Layer These TechniquesustrasanaOPEN YOUR HEARTThere's such a majestic and robust quality when it comes to heart openers in a physical yoga practice. In order to open your heart and gain greater access to a backbend such as Camel Pose,...
THE FREE TECHNIQUE PACK
When You Subscribe, You Will Get Instant Access to
- the Technique Pack: 15 yoga pose breakdowns
- exclusive online course discounts
- exclusive blogs and videos


