Build Better Joint Supportankle & kneeBUILD BETTER JOINT SUPPORT Sometimes we focus so heavily on flexibility that we forget our joints also need intelligent strength surrounding them. Matt reminds us that stability is not rigidity. It is the body’s ability to...
Build Connection On The Mat
Build Connection On The Mat
GROUNDING
BUILD CONNECTION ON THE MAT
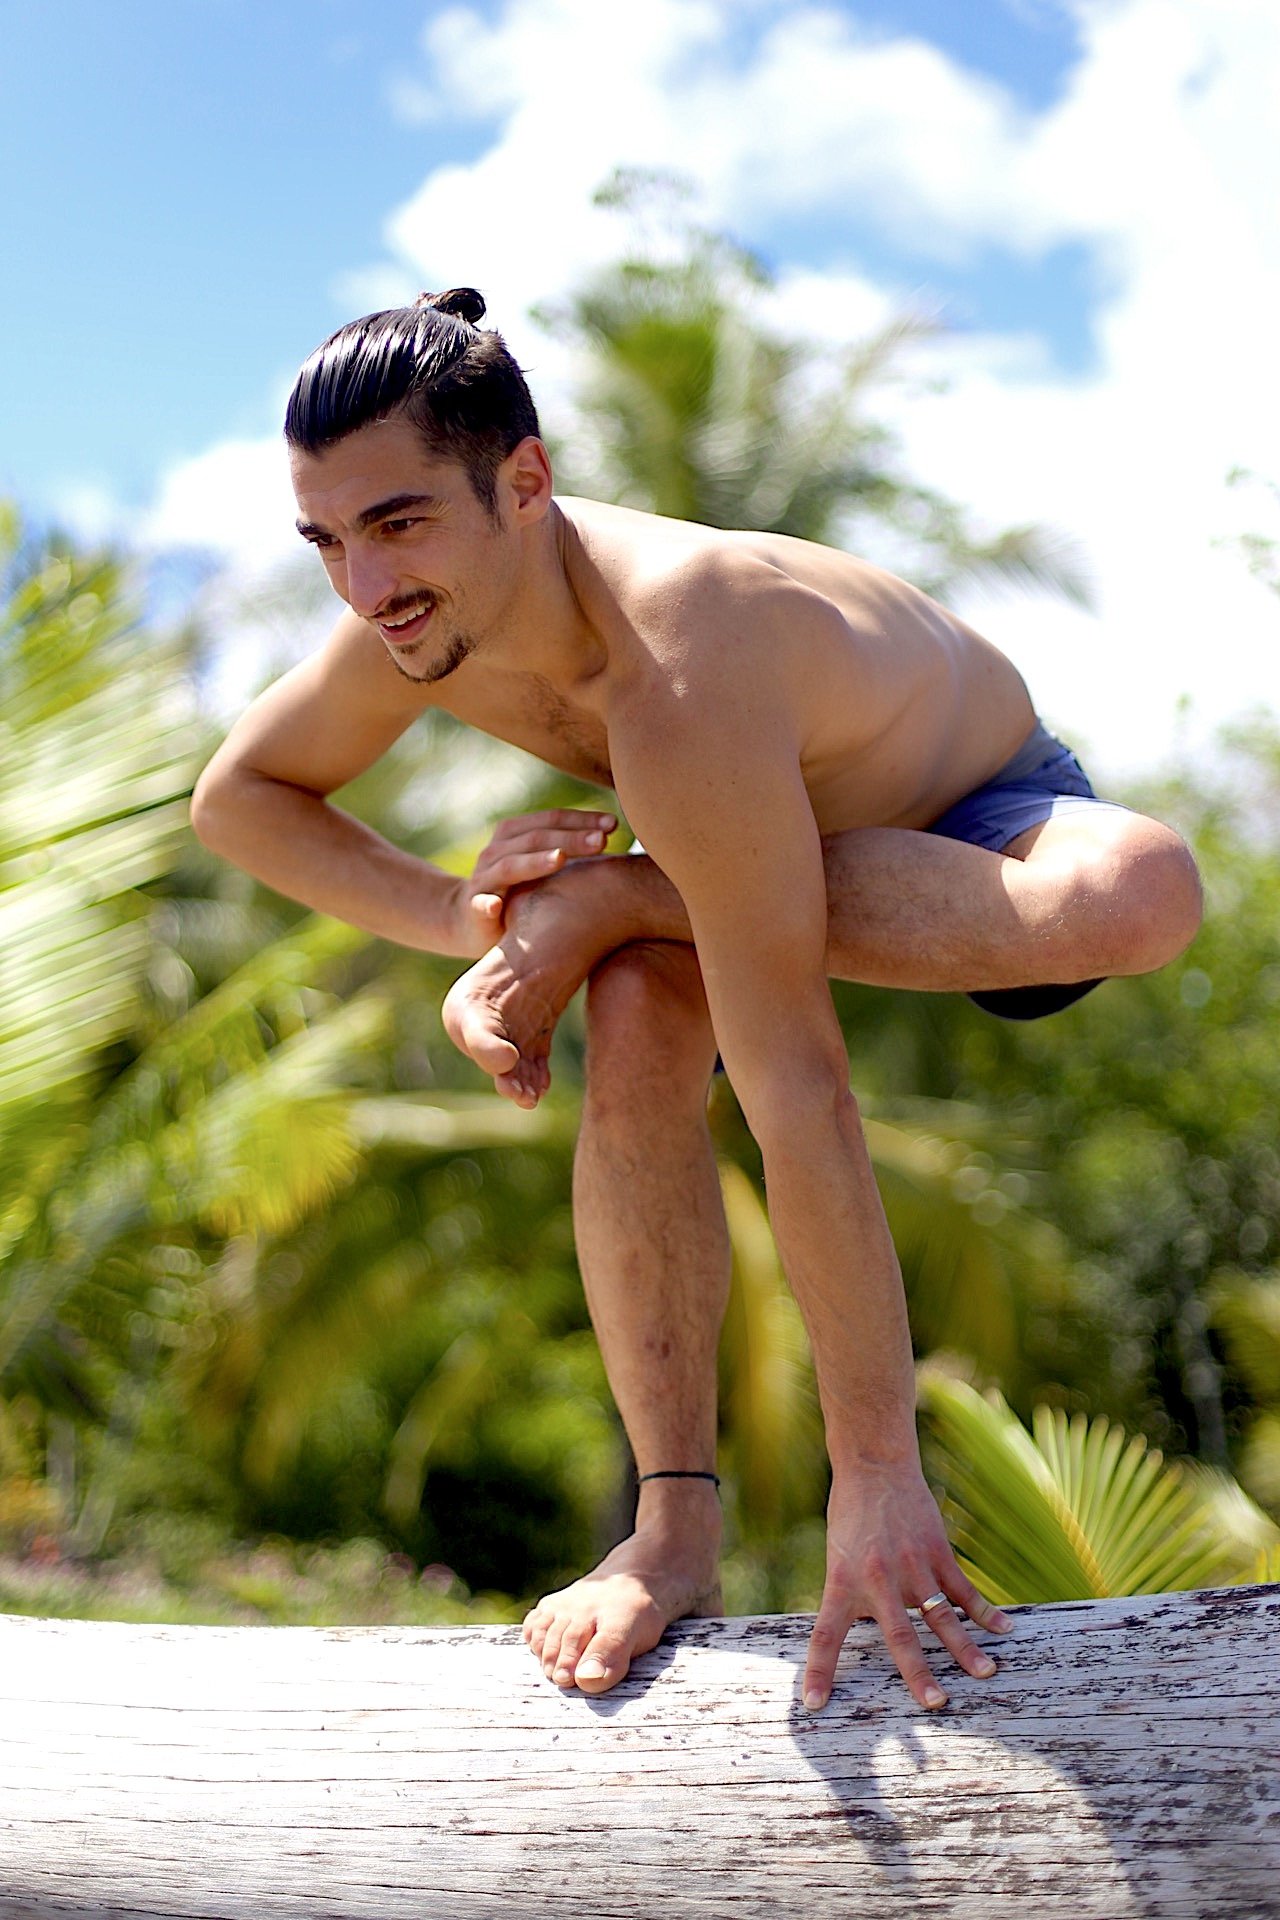
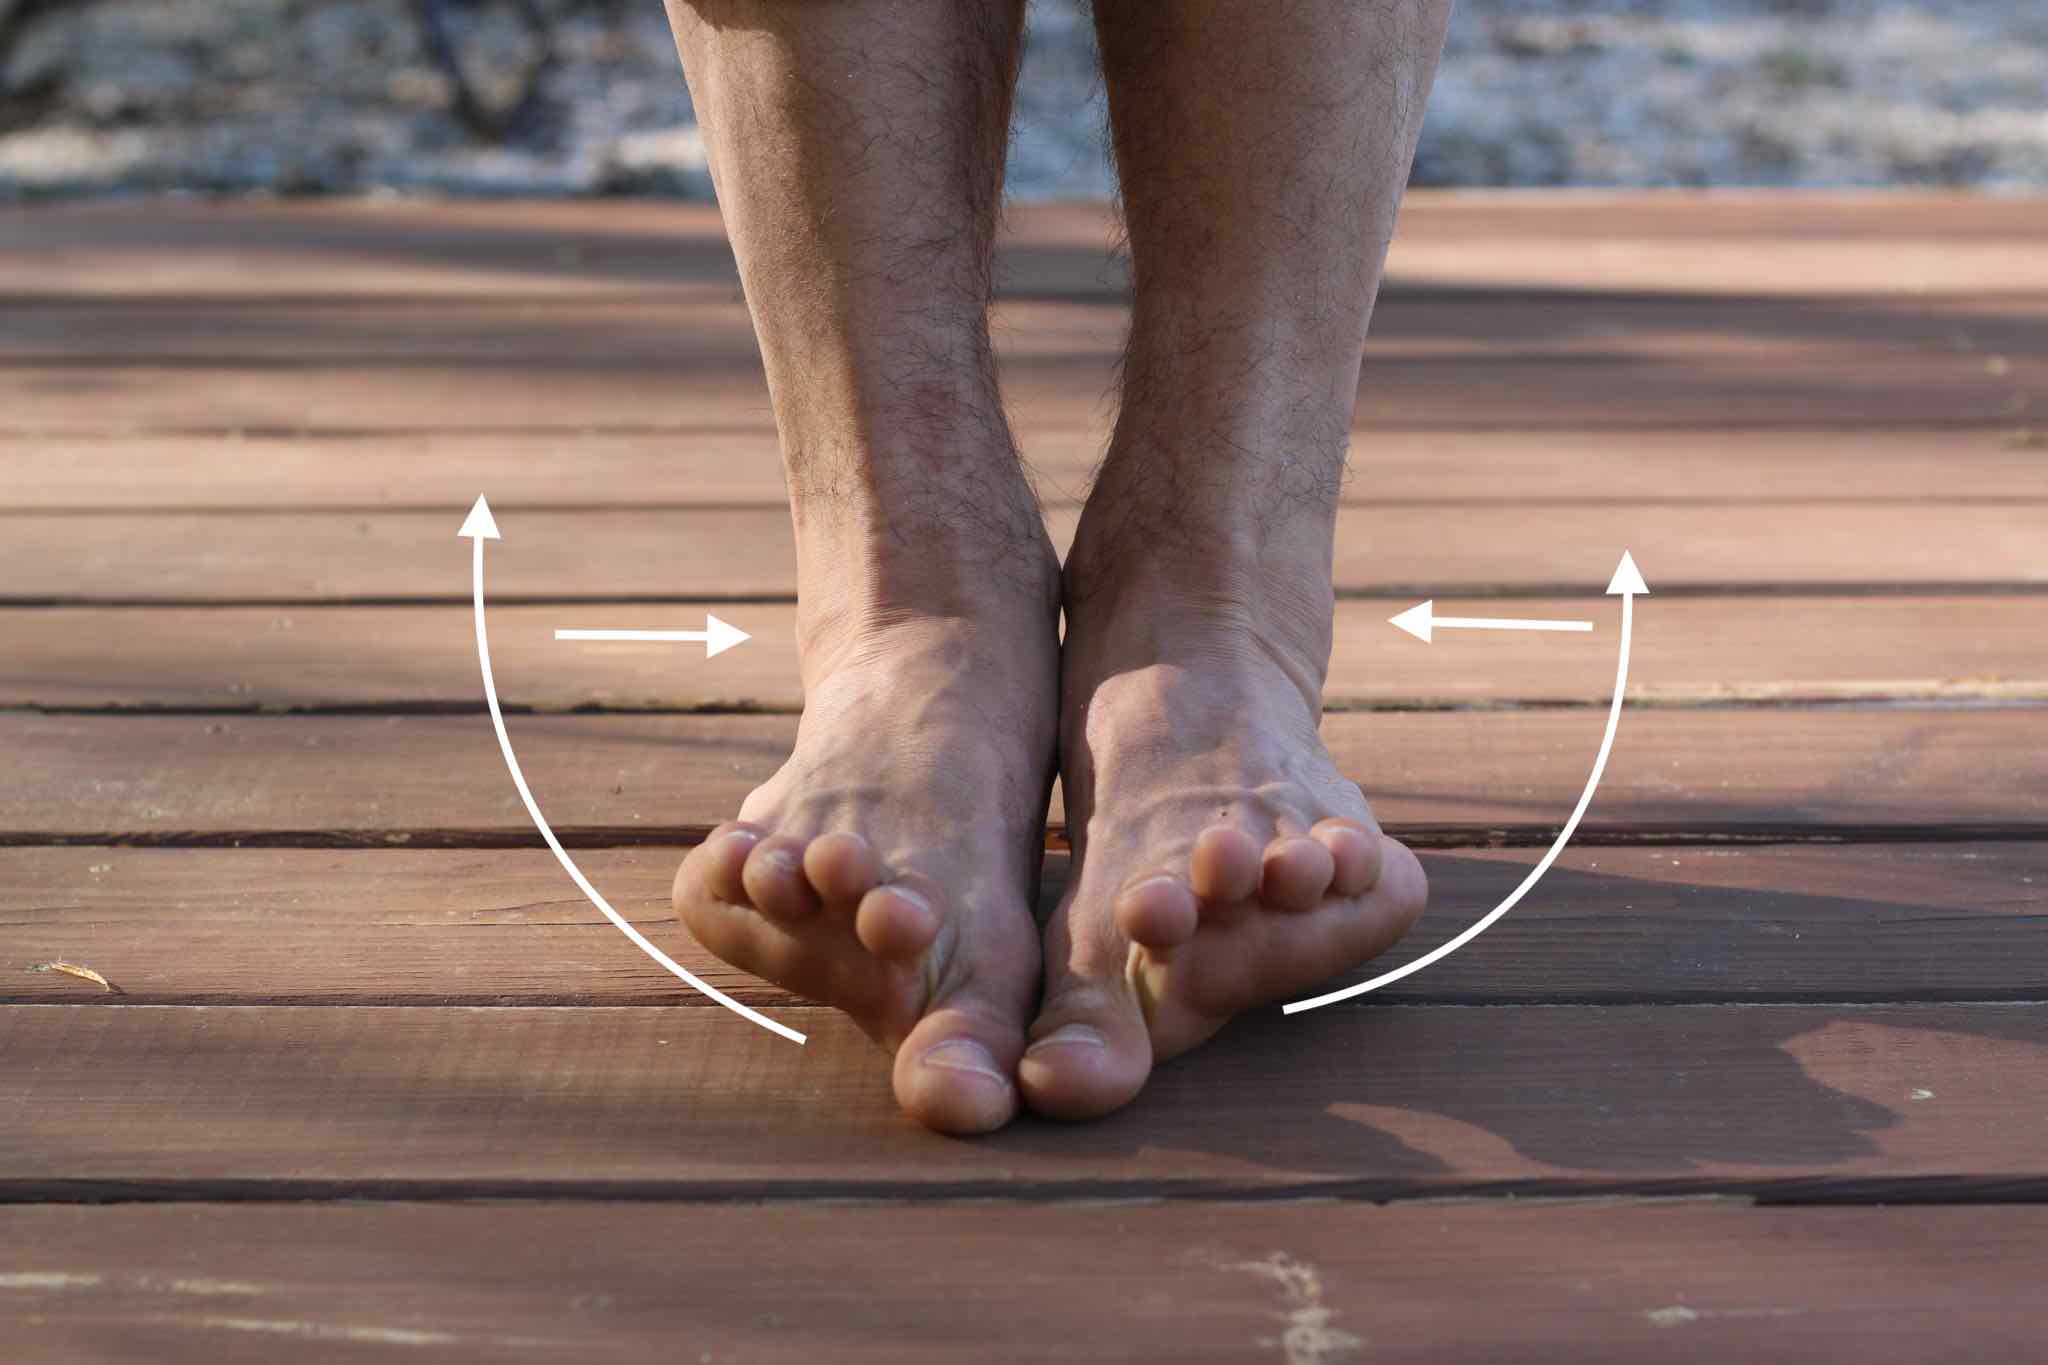
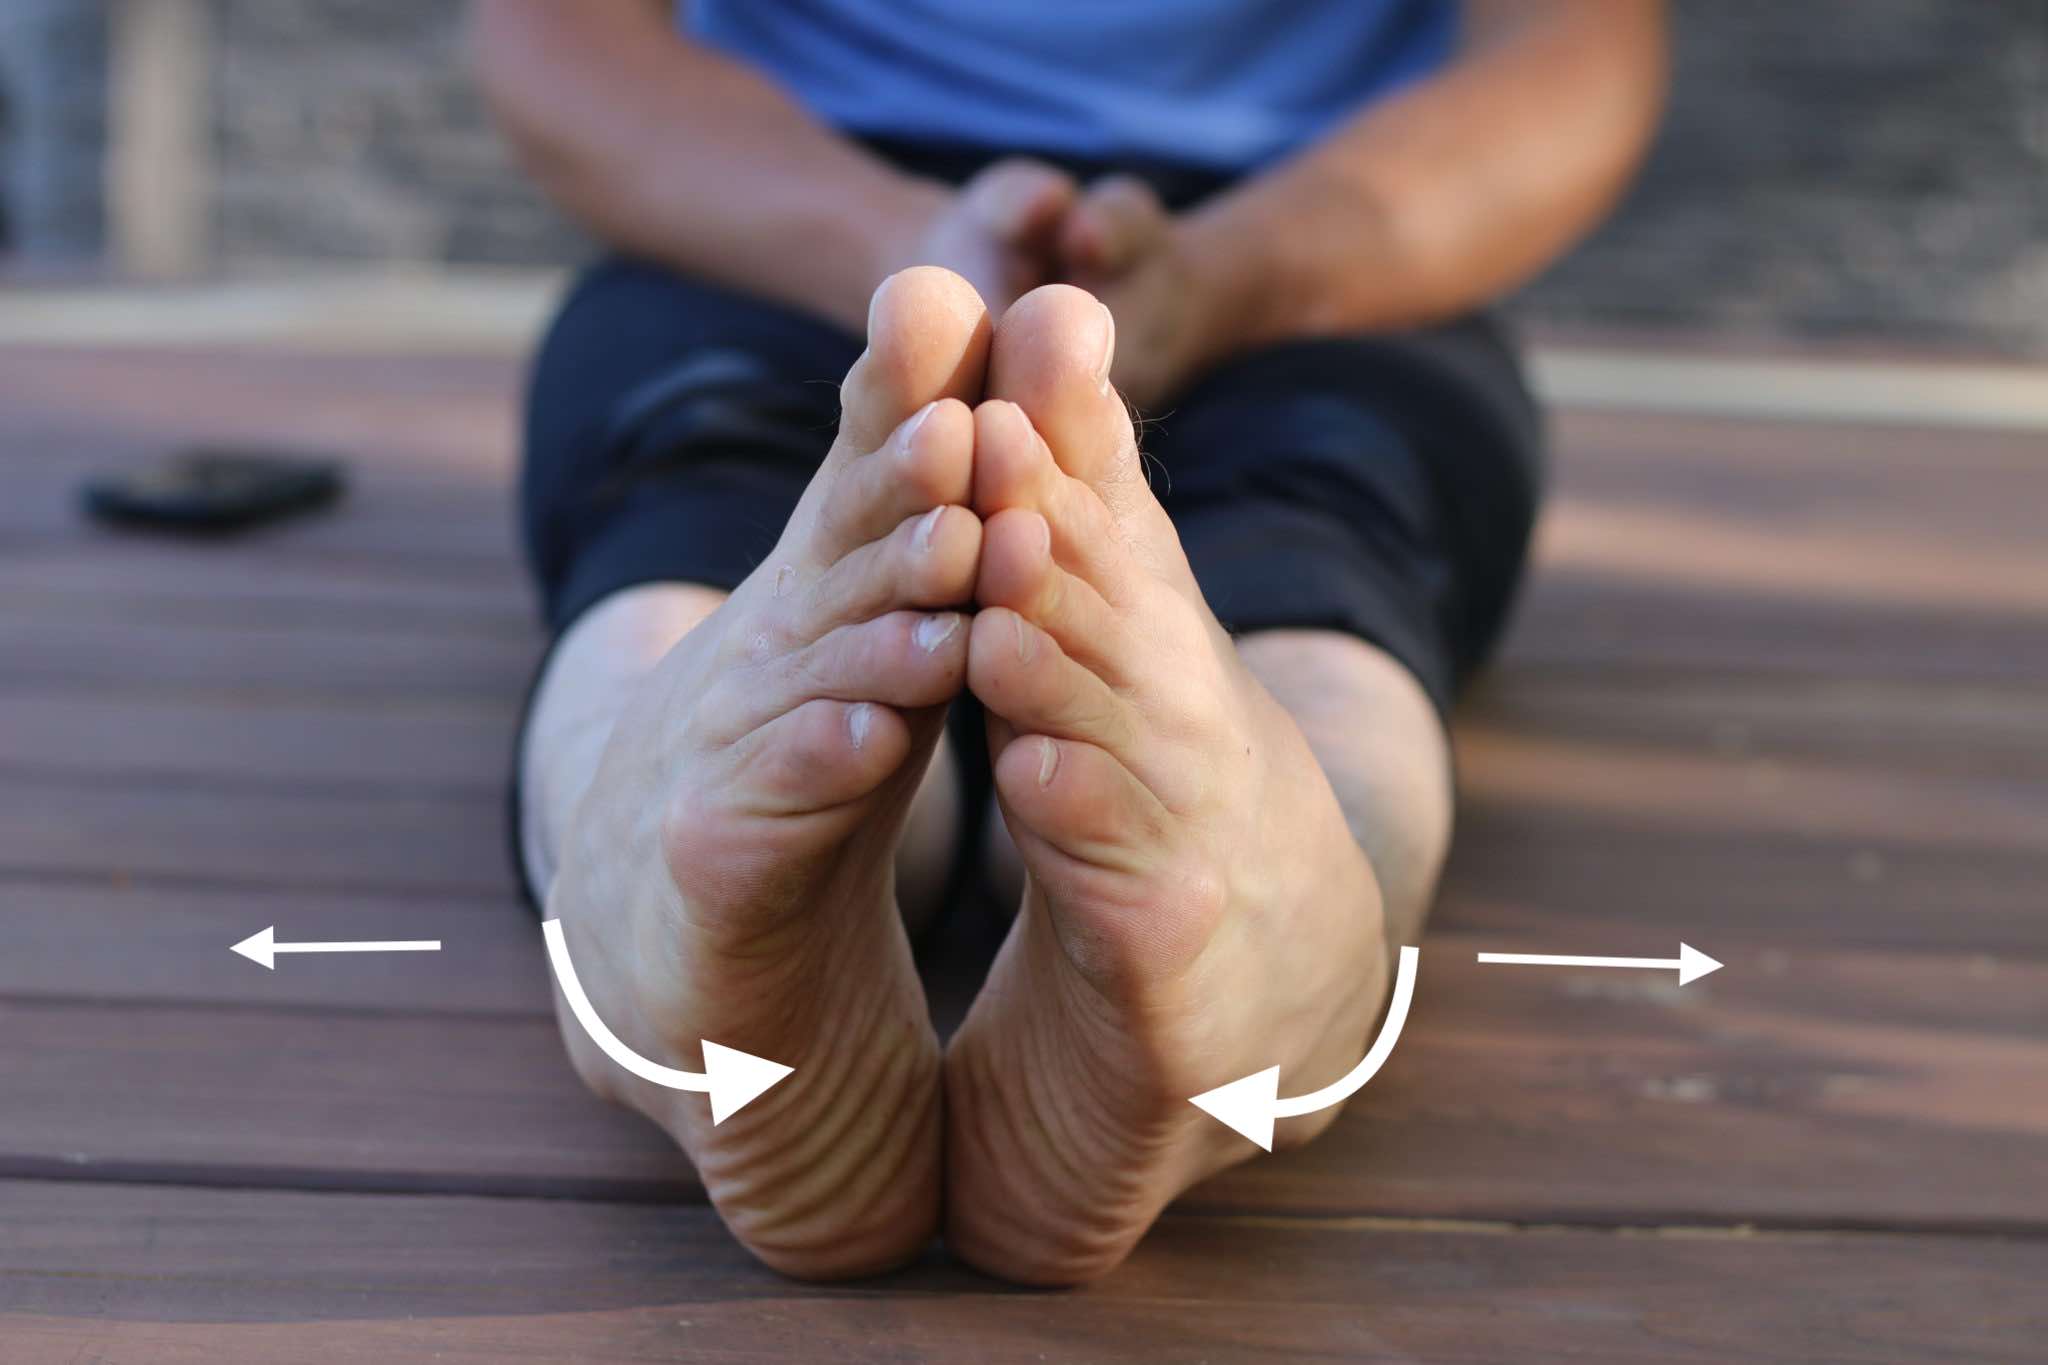
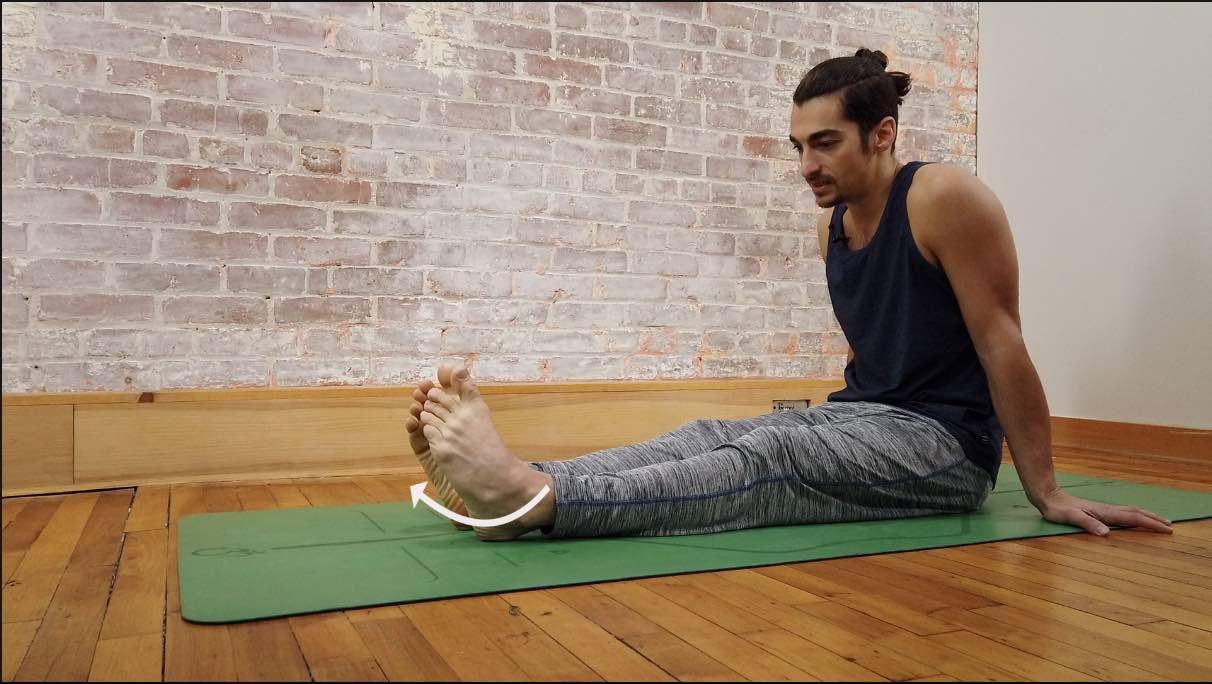
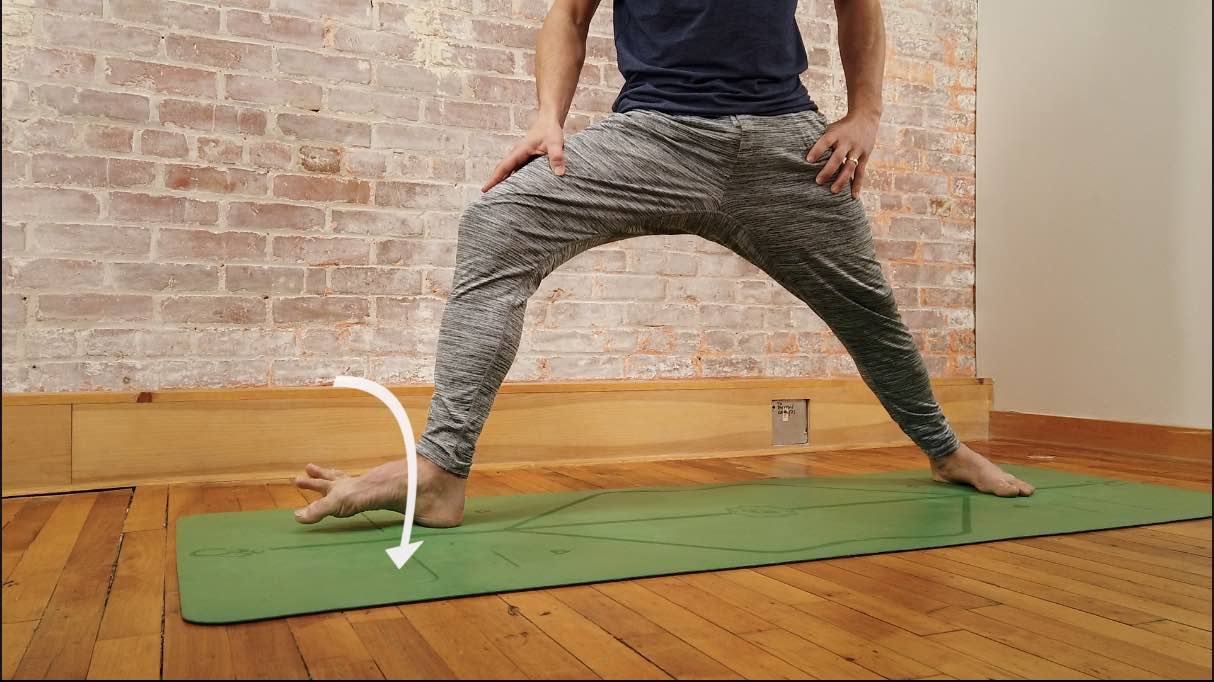
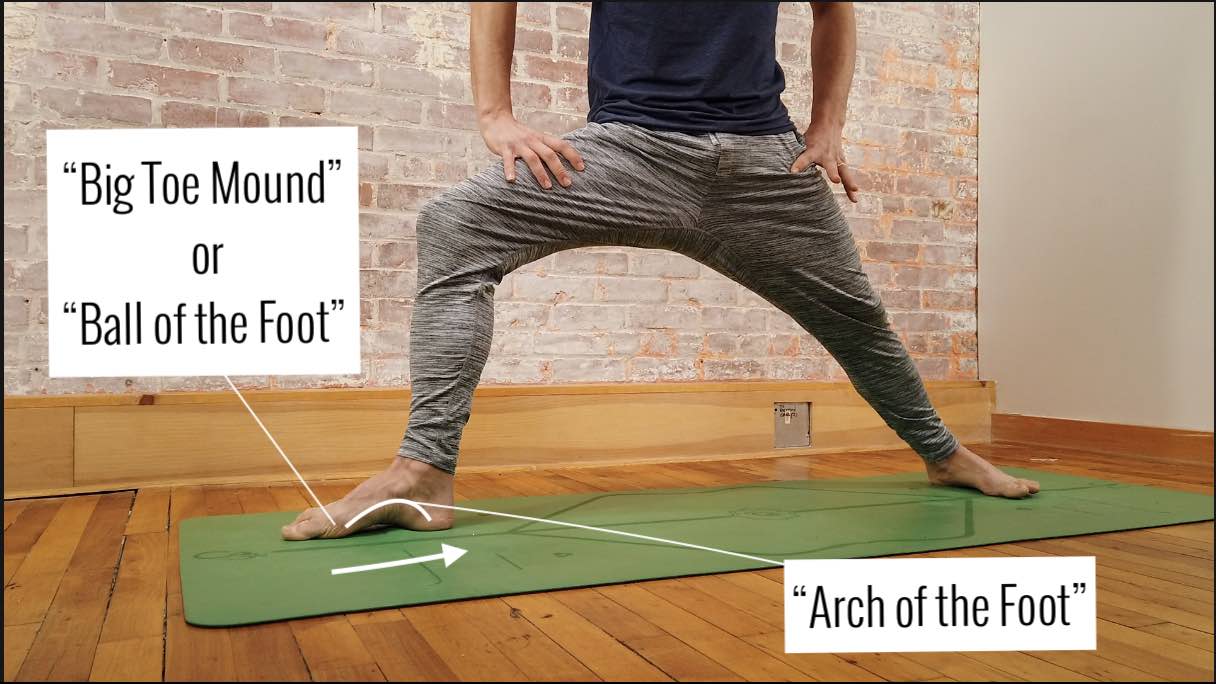
Building connection on the mat starts at the place we tend to overlook: our feet. If we only practice the “shape” of a posture, we can miss the biomechanics that change how the whole pose feels from the inside. Matt reminds us that one action can echo through the body when we know what we’re looking for. Here, the feet become the first teacher. We learn to shorten the sole of the foot by drawing the big toe mound and toe line back toward the heel, and we pair that with a second action: squeezing the legs inward. That inward tone connects to the pelvic floor, which sits like a supportive hammock between the bones of the ilium. Matt cues us to imagine this area like a dome, and when we squeeze in, we contract the dome upward. When we build connections on the mat it becomes a whole body experience.

SLOW FLOW & GO
YOGA ASANA, MEDITATION AND PRANAYAMA
- 10 Chromatic Yoga practices with founder Matt Giordano
- Physically Invigorating Yet Accessible
- Breath Work for Energetic Realignment
- Meditation for Clarity, Focus, and Grounding
- Themes for Inspiration
- Physically Well Rounded: All Postural Categories Will be Addressed
- Designed as “Your Daily Yoga” 60 Minute Classes
- Non-dogmatic, Anatomy informed Alignment
- The Perfect Blend of Knowledge and Practice
- Chromatic Slow Flow Style: Moderate Vinyasa Pacing Infused with Technique and Non-dogmatic Alignment
- 10 Continuing Education hours with Yoga Alliance and American Yoga Council
- 10 Accredited Practice Hours with the Chromatic School of Yoga
- Step-by-Step instruction for increased accessibility
- Sweat, Breath, Strengthen, Stretch and Feel Amazing!
WARRIOR II FEET
In Warrior II, Matt has us relax the hands first and choose a long stance we can actually control. He cues a subtle shift of the pelvis back, almost like sitting into a chair behind us, so the base feels organized before the arms even lift. Then we find the front foot: a slight lean into the big toe side, and we “scrunch” the sole to build a strong arch. This happens when the big toe mound draws toward the heel. We repeat the same idea in the back foot, even though it’s trickier because the ankle is in an inverted position. To relieve strain in the outer ankle ligaments, Matt brings in the second action: squeeze the legs toward each other, like we’re narrowing the gap between the inner thighs. That squeeze creates the doming effect up through the pelvis and spine. When we build Connection on the mat it feels less like holding a stance and more like standing inside a support line.
WATCH THE VIDEO
BUILD CONNECTION ON THE MAT: HOW YOUR FEET INFORM YOUR PRACTICE
GET MORE OUT OF SIDE ANGLE PREPARATION
From that Warrior II base, Matt takes us into Side Angle preparation with forearm to thigh, but he keeps the focus on the feet first. We shorten the soles again (big toe mound toward heel), then we let the inner thighs isometrically contract just enough that the posture starts to feel “self-held.” He cues a slight inward turn of the back thigh, which helps the back leg stop leaking out into the outer ankle. The squeeze of the legs becomes the bridge to pelvic floor support: inner thighs draw in, and the pelvic floor “dome” lifts upward rather than dropping down and forward. Matt suggests that the right hand (when it’s the front hand) can lower toward the ground without collapsing the base. Additionally, the chest lengthens forward and the top arm reaches to the sky. Build connection on the mat turns Side Angle into a posture we can trust, not one we brace through.

200 HOUR ONLINE TEACHER TRAINING
GET CERTIFIED & DEEPEN YOUR YOGA PRACTICE
- Deepen your yoga practice
- Build confidence speaking in front of groups in person and online
- Learn foundational class structures and templates
- Learn techniques for a wide range of yoga postures
- Get certified and highly qualified to teach yoga
- Yoga Alliance Globally Recognized Certification Program
LIZARD CONNECTION
In Lizard, Matt keeps it simple and grounded. First, the front foot steps out, back knee lowers, and we lift the hips slightly, “stick the bum up” just enough to create space. He cues an inhale to lift the chest, then an exhale down to the elbows for a few breaths. Even here, in order to build connection on the mat we stay with a “foot-led” mentality. Matt has us look at the front foot and rebuild the arch by committing to the same action of the big toe and big toe mound squeezing back toward the heel. Then he layers in traction (pulling the front heel back toward the knee while the back knee subtly drags forward toward the heel). This again creates a controlled isometric “hug” through the legs. That action wakes up the inner thighs and gives the pelvis more integrity, so the stretch becomes intelligent instead of sloppy. The result is a lizard that feels supported from the ground up, not just deep.

300 HOUR ONLINE TEACHER TRAINING
GET 500 HOUR CERTIFIED AS A MASTER TEACHER
Master your skill set as a teacher through refined techniques, anatomy, biomechanics, sequencing, philosophy, meditation techniques, theming, yoga business, and much more!
- Get 500 hour certified
- Learn anatomy, biomechanics, asana techniques
- Expand your teaching skills
- Masterful sequencing and verbal delivery
- Learn meditation and breathwork techniques
- Transformative tools: theming, dharma talks, satsang
ROOT, DOME, RISE
So, to build connection on the mat it’s ultimately two actions repeated in different “clothing”. The “outfits” includes shortening of the sole, and a squeeze of the legs in. The feet give us a clear starting point which is having the arch active, big toe mound drawing toward heel and then the inner thighs take the message upward into pelvic floor for support. Matt’s dome image is powerful because it keeps the pelvic floor from becoming vague: we don’t “push down” into effort, we contract the dome upward and let that lift echo through the spine and head. Warrior II teaches the base, Side Angle shows how it holds under reach and rotation, and Lizard proves we can stay connected even in deeper shapes. When we return to these actions consistently, the practice stops being about getting through poses and becomes about building a body that knows how to organize itself. That’s the real promise of a path that builds connection on the mat.
If you want to delve deeper into what our yoga practice has to offer then you won’t want to miss out on Matt’s current online immersion Slow Flow & Glow.
The 200 Hr. Teacher Training: Click Here to See the Next Start Date
The 300 Hr. Advanced Teacher Training: Click Here to See the Next Start Date
Article by Trish Curling
Video Extracted From: Slow Flow & Go Immersion

ONLINE ANATOMY COURSE
- Accessible, exciting, and easy to learn
- Anatomy and biomechanics for yoga
- Appropriate for both teachers and students
- Learn joint alignment vs pose alignment
- Demystify yoga poses and transitions
- Release aches and pains
- Learn how to avoid common injuries
- Caters to all levels with modifications and props
- 20 hours Continued Education Credits with Yoga Alliance
- 20 hours toward Chromatic Yoga Certification and 300 Hour
- Lifetime access
Continue Learning
Build Better Joint Support
read more
Hamstring Strength Options
Hamstring Strength Optionship extensorsHAMSTRING STRENGTH OPTIONS When we think about hamstrings in yoga, most of us immediately think about stretching. Matt reminds us that this powerful muscle group is rarely celebrated for what it is also designed to do: create...
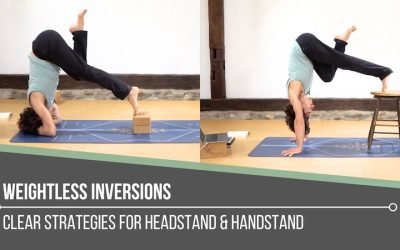
Weightless Inversions
Weightless InversionssirsasanaWEIGHTLESS INVERSIONS Weightless inversions are not about removing effort. They are about redistributing it with awareness. Matt reminds us that when we refine how we place weight through the hands, shoulders, and core, the body begins to...
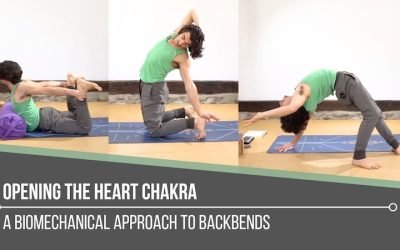
Opening The Heart Chakra
Opening The Heart ChakrabackbendOPENING THE HEART CHAKRA Opening the heart chakra is not simply about reaching deeper into a backbend. Matt reminds us that this space is rooted in love, balance, and connection, both with ourselves and with others. It reflects how we...
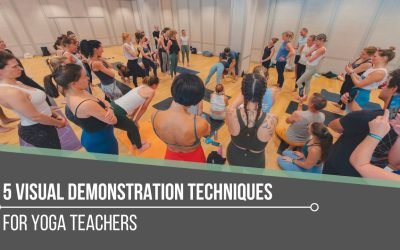
5 Visual Demonstration Techniques for Yoga Teachers
5 Visual Demonstration Techniques for Yoga TeachersYoga TeachersVisual Demonstration This is often confused with “teaching from the mat.” Teaching at the front of the room can be useful at the right time and place, but that is not what we are referring to here. In...
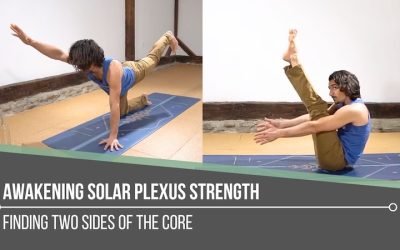
Awakening Solar Plexus Strength
Awakening Solar Plexus Strengththird chakraAWAKENING SOLAR PLEXUS STRENGTH Awakening solar plexus strength invites us into the centre of transformation. Matt reminds us that this third chakra, Manipura, is our fire, our willpower, and our ability to take action. It...
THE FREE TECHNIQUE PACK
When You Subscribe, You Will Get Instant Access to
- the Technique Pack: 15 yoga pose breakdowns
- exclusive online course discounts
- exclusive blogs and videos