Flying Revolved Half LotusARM BALANCEFLYING REVOLVED HALF LOTUS Some postures don’t arrive through imitation; they arrive through investigation. Flying Revolved Half Lotus is one of those shapes. It borrows familiar ingredients like Side Crow mechanics, hip opening,...
Fire Log Pose
Fire Log Pose
3 Actions for Increased Hip Mobility
agnistambhasana
FIRE LOG POSE
There’s such a joyous feeling when you’re unwrapping a gift and caught up in the anticipation of finding out what’s inside. This can be similar to the process of exploring a specific yoga posture, and the process of setting up and exploring Fire Log Pose (Agnistambhasana) can provide this kind of excitement. There are quite a few actions to take to prepare for this hip opening posture. Its initial setup reveals much about the state of your hip mobility at the time, which doesn’t mean that’s where you’ll reside forever. In today’s video, Matt shares 3 essential actions you can implement right away. Once you start to include these actions, which target the muscles that surround and facilitate hip opening, you can create a brand-new experience and reveal an entirely new gift of increased hip mobility.

LOTUS
- Anatomy-informed classes
- Increase hip mobility and range of motion
- Balance flexibility and strength
- Skillful techniques for Lotus variations and many other hip openers
- Moderate Vinyasa-style classes
- Unlock your Lotus Pose
- Learn the 4 Quadrants of the Hips
- 8 Classes: All levels appropriate
- Lifetime unlimited access to all
- Attend the livestream OR practice the replays any time that’s convenient for you
$128.00 $108.00
A GREAT PLACE TO START
The key to a great start with Fire Log Pose is in the alignment. Yes, you can probably say this about any posture, but the way in which you set up your body in Agnistambhasana is the difference between getting feedback about your hip mobility or moving away from that awareness. Matt stresses that creating a “stack”—knee over ankle and ankle over knee—is what truly exposes where you are in regard to your own hip mobility. Now, if you’re quite mobile, this will be quite accessible. If the opposite is true, then this setup may seem unachievable. In both scenarios, however, the 3 actions that Matt provides will work to create strength, stability, and flexibility, and therefore increased mobility. In the video, you’ll see how Matt utilizes props in order to allow for the sensational feedback required to unravel what’s happening within.
WATCH THE VIDEO
FIRE LOG POSE: 3 ACTIONS FOR INCREASED HIP MOBILITY
ACTION 1
Part of improving hip mobility is activating the muscles that surround the hip in order to be able to mobilize the thigh bone inside of the hip joint. When it comes to Fire Log Pose, your hips are in an externally rotated position. The first action Matt invites you to take is to ignite the internal rotators. As in the video, if your left leg is on top, you’ll place your open palm on top of your left knee while pushing downward. At the same time, you’ll press your knee diagonally up into the hand, across to the right shoulder. In order to fire up the muscles on the other side, you can place your hands on blocks while pulling your right knee up into the ankle. This demonstrates how important the “stacking” is: It provides a more stable nook to execute this action.

200 HOUR ONLINE TEACHER TRAINING
GET CERTIFIED & DEEPEN YOUR YOGA PRACTICE
- Deepen your yoga practice
- Build confidence speaking in front of groups in person and online
- Learn foundational class structures and templates
- Learn techniques for a wide range of yoga postures
- Get certified and highly qualified to teach yoga
- Yoga Alliance Globally Recognized Certification Program
ACTION 2
In this next action, you’ll be firing up the external rotators of the hip. Depending on what you’re experiencing, there are a few options you can take. Matt still recommends that you set your hips back and bow forward. Here’s where you can play with different options though: You can use your hands, forearms, or blocks to press your feet into. The next detail is the “micro” tuck of the tailbone, and it makes a significant difference in supporting the movement of external rotation and the activation of those muscles. Even though it is a “micro” movement, it really has a notable impact on the level of awakening you will feel in those muscles. After spending some time here, check in with yourself. Now that you’ve been working on exhausting the muscles, you may notice a difference in your ability to “stack” in Fire Log Pose.

300 HOUR ONLINE TEACHER TRAINING
GET 500 HOUR CERTIFIED AS A MASTER TEACHER
Master your skill set as a teacher through refined techniques, anatomy, biomechanics, sequencing, philosophy, meditation techniques, theming, yoga business, and much more!
- Get 500 hour certified
- Learn anatomy, biomechanics, asana techniques
- Expand your teaching skills
- Masterful sequencing and verbal delivery
- Learn meditation and breathwork techniques
- Transformative tools: theming, dharma talks, satsang
ACTION 3
This final action is tied into the previous one, but it may be more up your alley. It could be the better option if you’re still not feeling enough sensation in your hips. Instead of pressing into your feet (as in Option 2), you can place your hands on your knees and press your knees into your hands. This will activate the abductors. Along with the micro tuck of the tailbone, an essential cue to consider here is the action of rotating your upper thigh bones out, externally. An easier way to think about this cue may be to press your knees down and out.
All of these actions facilitate increased hip mobility. Like Lotus, discussed in a previous article, Fire Log Pose is a deep hip opener and should be approached with an understanding that the preliminary work is what actually provides the benefit.
TRUST THE PROCESS
It’s important not to rush the process. When exploring these actions in Fire Log Pose, spend time breathing while holding the position in order to activate the muscles and give your nervous system time to adjust and create new patterns. This is what initiates change and transformation in your experience. The gift is in the groundwork.
Register for Matt’s March 2023 Lotus Immersion to dive deeper into more techniques for improved hip mobility.
See you on the mat!
The 200 Hr. Teacher Training: Click Here to See the Next Start Date
The 300 Hr. Advanced Teacher Training: Click Here to See the Next Start Date
Article by Trish Curling
Video Extracted From: Hips & Hamstrings Immersion

BREATH OF FIRE
- Moderate Vinyasa-style classes
- Core strengthening & integration
- Master your breath with pranayama practices
- Access your core in arm balances, heart openers, twists, forward folds, inversions, and more
- Learn where and how to breathe in challenging postures
- Each class will include one pranayama (breathwork practice) and several core strengtheners
- Access your core muscles: deep, superficial, anterior, posterior, and lateral
- 12 Classes: All levels appropriate
- Lifetime unlimited access to all
- Attend the livestream OR practice the replays any time that’s convenient for you
$148.00
Continue Learning
Flying Revolved Half Lotus
read more
Eka Pada Bakasana
Eka Pada BakasanaSINGLE LEG CROWEKA PADA BAKASANA Eka Pada Bakasana asks us to balance curiosity with patience. This one-legged crow variation isn’t just about lifting a leg, it’s about organizing pressure, timing, and trust in unfamiliar territory. The posture...
Eight Angle Pose
Eight Angle PoseASTAVAKRASANAEIGHT ANGLE POSE Sometimes we think arm balances are about getting higher, but Matt reframes Eight Angle pose as a mechanics workshop. This posture thrives when we test rotation, pelvic placement, and upper-body stability as interconnected...
Approachable Arm Balances
Approachable Arm BalancesPARSVA BAKASANAAPPROACHABLE ARM BALANCES Approachable arm balances aren’t about fearlessness; they’re about informed action. When we understand the mechanics behind the posture, we gain the power to shape our own outcomes. Rather than jumping...
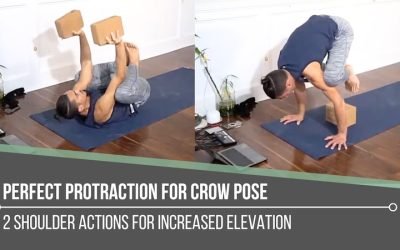
Perfect Protraction For Crow Pose
Perfect Protraction For Crow PoseBAKASANAPERFECT PROTRACTION FOR CROW POSE When working toward perfect protraction for Crow Pose, it’s essential to understand the role of the serratus anterior, the “fingertip” muscles that wrap around the rib cage and attach to the...
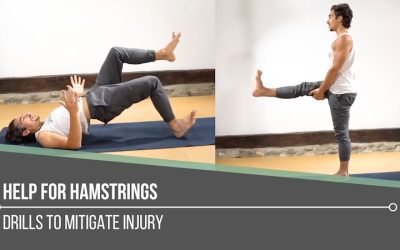
Help For Hamstrings
Help For HamstringsFLEXIBILITYHELP FOR HAMSTRINGS “Yoga butt” or high hamstring tendonitis can be a literal pain where the sit bones meet the hamstrings and glutes. This area is prone to overuse injuries, especially when repetitive forward folds overstretch rather...
THE FREE TECHNIQUE PACK
When You Subscribe, You Will Get Instant Access to
- the Technique Pack: 15 yoga pose breakdowns
- exclusive online course discounts
- exclusive blogs and videos


